Upgrading your exhaust system easily delivers a thrilling sound profile and sharper aesthetics. However, this modification frequently results in raw noise levels far exceeding strict track limits. You might also violate local compliance laws or ruin general rider comfort on long tours. Dealing with a loud pipe quickly becomes tiresome and expensive if you face regulatory fines. Finding the right insert presents a unique challenge for many riders. You need a device cutting decibels effectively without creating excessive backpressure. It must avoid annoying metallic rattling or choking your engine's overall power delivery. A poorly chosen baffle often causes more headaches than it solves. In this guide, we provide a highly practical, evidence-based framework for evaluating your options. You will discover exactly how to measure, size, and select the correct noise-reduction insert tailored specifically for your setup.
Key Takeaways
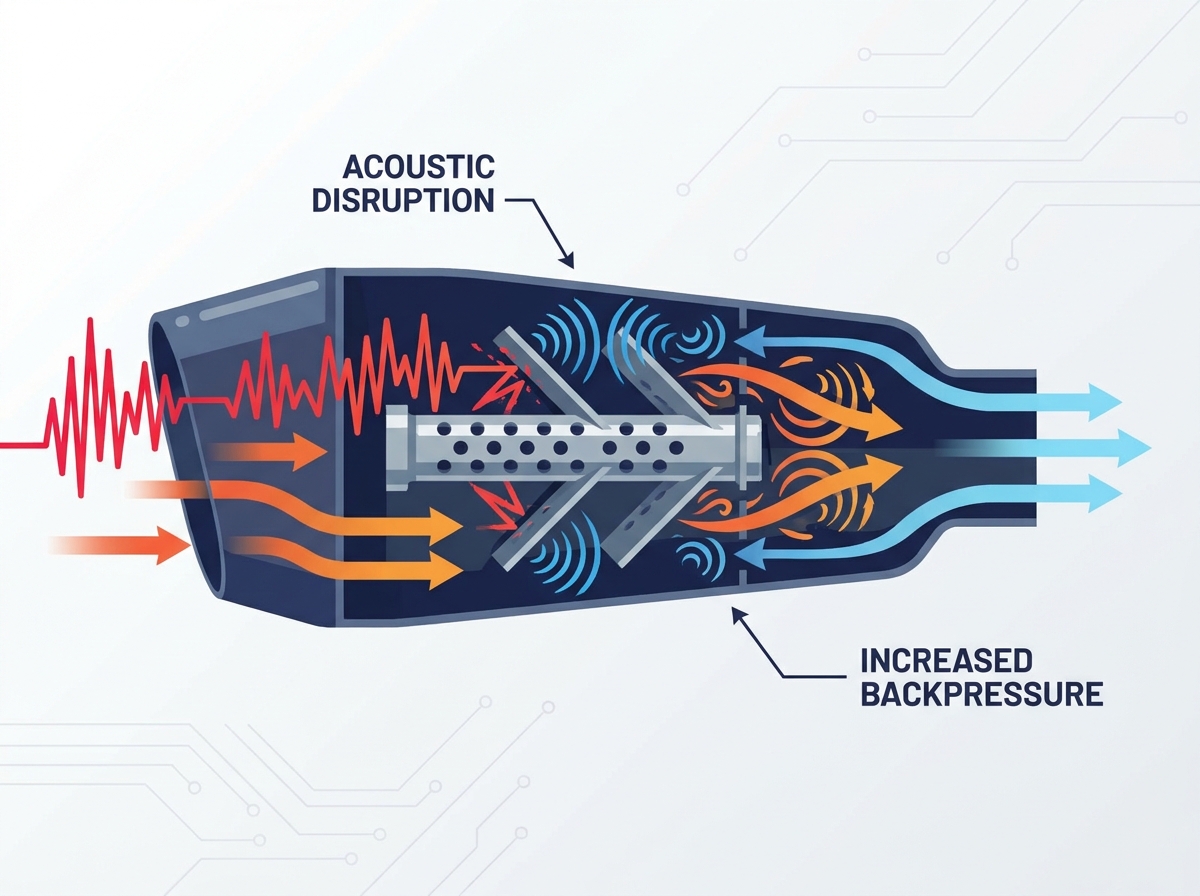
The primary function of a dB killer is to disrupt sound waves and restrict outlet flow, which inherently alters exhaust backpressure and engine performance.
Accurate slip-on inlet diameter checks using digital calipers are non-negotiable when selecting aftermarket or universal inserts.
Investing in a motorcycle muffler with a removable dB killer offers the best versatility for riders alternating between street commuting and unrestricted track days.
Universal dB killers often require modifications to sit securely; matching the insert to the specific exhaust brand is always the most reliable route.
Defining Your Requirements: Compliance vs. Performance Trade-offs
Business Problem Framing
Every modification requires a clear purpose. You must first identify the exact reason for altering your exhaust flow. Many track day organizations enforce strict noise limits. A standard track inspection often demands a maximum output of 95 decibels. Failing this test means you cannot ride. Alternatively, you might need to meet stringent local street regulations to avoid police citations. Touring riders face a different challenge entirely. Constant highway drone causes severe rider fatigue and potential hearing damage over long distances. Pinpointing your exact goal dictates how restrictive your chosen insert needs to be.
The Versatility Factor
Riders encounter diverse environments demanding adaptable sound management. You achieve the best baseline for this adaptability when you start your build using a motorcycle muffler with a removable dB killer. This setup allows you to switch between configurations easily. You can leave the baffle in for early morning commutes. Later, you can remove it for unrestricted performance at a closed circuit. Choosing a permanent, non-removable system locks you into a single volume level. Adaptable systems preserve your bike's usability across multiple riding scenarios.
Managing Expectations
We must acknowledge the reality of the performance trade-off. Reducing noise inherently requires restricting exhaust flow. You cannot lower decibels without creating physical barriers inside the pipe. This restriction inevitably alters your engine's backpressure. Depending on your current engine map, you might experience a slight shift in power delivery. Increased backpressure occasionally enhances low-end torque. However, it frequently restricts top-end horsepower. Riders must balance their desire for a quieter machine against these minor performance sacrifices. Professional tuners always recommend setting realistic expectations before installing highly restrictive baffles.
The Mechanics: How a dB Killer Reduces Exhaust Noise
Acoustic Disruption
Understanding exactly how a dB killer reduces exhaust noise requires a brief look at acoustic physics. High-performance engines generate intense sound waves. A properly designed baffle forces these rapid exhaust gases through narrow perforated tubes. Some designs use angled metal plates. These physical barriers break up high-frequency sound waves before they exit the tailpipe. The insert scatters the acoustic energy, forcing sound waves to collide and cancel each other out. This process dramatically lowers the perceived volume reaching human ears.
Flow Dynamics
Exhaust flow dynamics dictate both sound output and engine efficiency. We generally categorize inserts into two primary types: straight-through and capped. Straight-through designs feature an open center tube surrounded by perforated walls. They offer minimal flow restriction and minor noise reduction. Conversely, capped inserts block the direct gas path completely. They force gases out through side holes into a separate chamber. This creates maximum noise reduction but introduces high backpressure.
Table: Exhaust Insert Flow Dynamics Compared
Insert Type
Design Feature
Noise Reduction Level
Backpressure Impact
Best Use Case
Straight-Through
Open center, perforated walls
Low to Moderate (2-4 dB)
Minimal restriction
Minor street compliance, preserving top-end power
Capped / Chambered
Blocked end, side exhaust ports
High (4-8+ dB)
Significant restriction
Strict track limits, curing heavy highway drone
Adjustable / Variable
Movable internal plates
Variable
Variable depending on setting
Riders needing multi-environment tuning
Tuning Realities
Adding or removing a highly restrictive unit shifts your engine's breathing characteristics. Your bike's Electronic Control Unit (ECU) manages the air-to-fuel ratio. If you run a custom tune designed for an open pipe, installing a tight baffle richens the mixture. The engine cannot expel gases fast enough. Conversely, removing a baffle from a tightly restricted system leans out the mixture. Lean conditions often trigger aggressive deceleration popping. You might need to adjust your ECU mapping if you make drastic changes to your exhaust flow. Professional dyno tuning ensures safe operation and prevents long-term valve damage.
Solution Categories: OEM-Specific vs. Universal Inserts
Brand-Specific Inserts (The Secure Route)
Choosing the exhaust manufacturer's proprietary insert guarantees peace of mind. Engineers design these specific baffles to match their own silencers perfectly. They account for exact internal tapers, specific flow rates, and precise mounting hole locations. Buying the OEM part eliminates guesswork. You guarantee proper alignment upon installation. Furthermore, the manufacturer already tested the backpressure tolerances. This ensures your bike runs safely without triggering warning lights. The secure route costs more upfront but saves countless hours of frustrating modifications later.
Universal dB Killers (The Risky Route)
Universal options flood the aftermarket segment. They promise easy installation across various brands. However, relying on universal solutions introduces significant scalability risks. Universal fitment usually means imperfect fitment. A loose baffle rattles violently against the inner pipe. This metallic vibration ruins your exhaust tone and accelerates metal fatigue.
Consider these common failure points associated with cheap universal inserts:
Poor Welding: Low-budget manufacturing often leaves weak spot welds. These snap easily under intense exhaust pressure and vibration.
Vibration Fatigue: Loose tolerances cause the unit to shake continuously. This eventually strips mounting bolts or cracks the silencer casing.
Ejection Dangers: A poorly secured insert can shoot out of the tailpipe at highway speeds. This creates a severe hazard for following vehicles.
Choked Flow: Universal units rarely account for specific engine displacements. They might restrict a 1000cc superbike far too aggressively.
Material Considerations
Material selection dictates lifespan. You generally choose between stainless steel and aluminum. Stainless steel offers vastly superior durability. It withstands thousands of extreme exhaust heat cycles without degrading. It also resists vibration fatigue effectively. Cheap aluminum variants tempt buyers through lower prices and lighter weight. However, aluminum is highly prone to warping under intense heat. A warped insert fuses itself inside the pipe, making future removal impossible. We strongly recommend high-grade stainless steel for any serious exhaust modification.
Critical Sizing and Installation Protocols
Precision Measurement
Accurate sizing prevents installation disasters. You must rely on precise slip-on inlet diameter checks before purchasing any aftermarket part. Never use a flexible tape measure for this task. You need a high-quality digital caliper. Insert the caliper jaws into the muffler's outlet opening. Expand them until they touch the internal walls. Record this internal diameter in millimeters. Even a one-millimeter discrepancy prevents a successful installation. An oversized unit will not slide in. An undersized unit will rattle endlessly.
Length Constraints
The length of your chosen baffle matters just as much as its diameter. Many riders ignore internal clearances. If your silencer features an internal bend or a catalytic converter honeycomb, a long straight insert will crash into it. Measure the available internal depth using a rigid probe. You must ensure the new insert clears all internal packing materials and mid-pipe bends. A baffle bottoming out prevents the mounting holes from aligning properly.
Mounting Security (Compliance & Safety)
Evaluating your mounting mechanism is crucial for safety and compliance. High-quality designs utilize a sturdy bolt-on approach. You should always apply high-temp Loctite to the securing bolt. Adding a split lock washer provides extra insurance against vibration loosening. Some premium systems use heavy-duty circlips installed with specialized pliers. We strongly advise against using friction-fit designs. Avoid setups relying on tiny, cheap set screws tapping directly into thin metal. These inferior methods frequently fail under load, turning your baffle into a dangerous projectile.
The Shortlisting Framework: Next Steps for Buyers
Step 1: Check for Direct-Fit Replacements
Contact your exhaust manufacturer first. Look up your specific model number on their website. If they sell a direct-fit proprietary replacement, stop your search immediately. Purchase the OEM part. It eliminates all fitment risks and preserves your warranty.
Verify the hardware included. Ensure the manufacturer provides the correct mounting bolts or rubber grommets needed for your specific can.
Step 2: Document Exact Universal Dimensions
If you must go the universal route, compile your data meticulously. Write down the exact internal diameter using your caliper measurements.
Record the maximum allowable insert length. Check the mounting hole angle. Some pipes require a straight downward bolt, while others use an angled side-mount. Match these specs perfectly to the universal product listing.
Step 3: Evaluate Reduction Claims Skeptically
Approach marketing materials with caution. Many cheap brands claim massive 15-decibel reductions. This is mechanically improbable for a simple slip-in unit.
Assume a standard internal baffle will drop peak volume by roughly 3 to 6 decibels. Plan your track day compliance strategy around realistic acoustic physics, not exaggerated sales copy.
Step 4: Plan the Post-Installation Test
Never assume the job is done once the bolt tightens. Plan a careful post-installation test ride.
Start the bike in a controlled environment. Listen closely for unwanted metallic rattling. Pass your hand near the mounting hole to check for minor exhaust leaks. Observe your throttle response during the test ride. Note any heavy hesitation or sudden decel-popping indicating a need for ECU adjustments.
Conclusion
A dB killer operates as a highly functional mechanical part, not merely a cosmetic accessory. Choosing the right one demands precision and clear intent. Prioritizing exact dimensional measurements over cheap, universal fixes ensures your safety on the road. It also preserves your motorcycle's intended ride quality. Following a structured approach removes the guesswork from noise management.
Consider these final actionable steps before starting your project:
Measure your exhaust outlet twice using high-quality digital calipers to guarantee accuracy.
Verify your local street or track decibel limits before purchasing any restrictive hardware.
Source a structurally sound, stainless-steel insert matching your specific performance goals.
Always secure the unit using proper high-temperature thread locker and lock washers.
FAQ
Q: Do dB killers negatively affect engine performance?
A: Yes, to a minor degree. By restricting exhaust flow, they increase backpressure. This can slightly boost low-end torque but may restrict top-end horsepower. The severity depends on the insert's design and the bike's tuning.
Q: Can I use a universal dB killer in any aftermarket slip-on?
A: Only if the internal dimensions match flawlessly. Universal inserts often suffer from loose fitment, which causes metallic rattling and risks the insert vibrating out while riding.
Q: How much quieter does a dB killer actually make a motorcycle?
A: On average, a standard removable baffle will reduce exhaust volume by 3 to 8 decibels. While this sounds small numerically, a 3dB drop roughly halves the perceived sound energy, making a noticeable difference to human ears and compliance meters.
Q: Do I need to retune my motorcycle after installing a dB killer?
A: Generally, no, if you are simply re-installing an insert into an exhaust designed for it. However, if the bike was custom-dyno tuned without the baffle, putting a restrictive one back in will cause it to run rich, which may require an ECU adjustment.